A Minimalistic Guide to Clusters (and SLURM)
In the previous lab where I used to work, I used to manage training neural network models on a GPU server without any job scheduler. ssh, create a virtual environment in Python and train in a screen! That simple.
I have recently changed my lab and suddenly, found myself working with a cluster requiring considerably more preparation to train models. However, as I gradually learnt more about it, it became clearer that it is actually very easy and extremely efficient when resources are shared.
This short blog post aims to a) give the most important steps to use a cluster for a complete newbie and b) summarize what should be done to use in the future!
Understand a cluster
One important basic distinction that one should make is the difference between a server and a cluster. A server, also known as a node, is a single computer, pretty much like the one that you are using to read this post. On the other hand, a set of nodes connected together which are able to coordinate between themselves in a scheduled and systematic way is called a cluster. Therefore, you can imagine clusters are more robust and efficient for running intensive jobs.
The following figure shows a cluster.
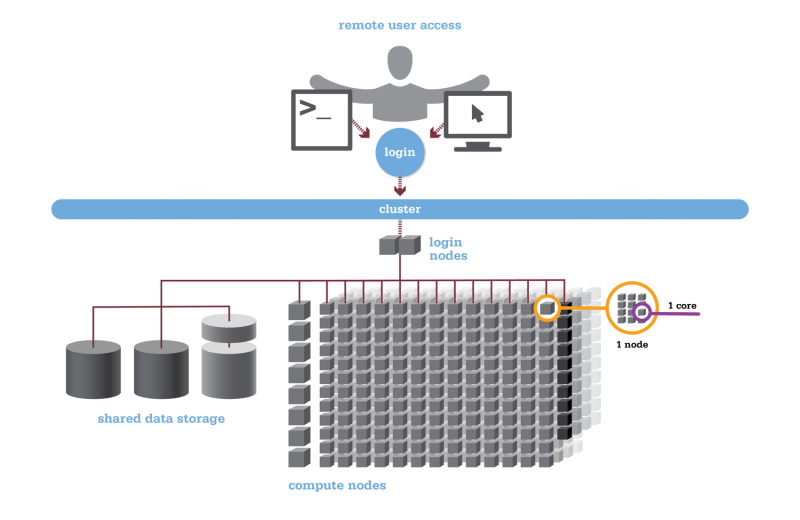
As you see in the figure, the user initially connects to the login nodes where jobs are prepared and the requirements for running a specific code are set up. Login nodes serve as a staging area to submit jobs to the batch scheduler in the cluster.
Once your code, data and whatever you need to run your job is ready on the login nodes, it is time to submit your job to the batch scheduler. Once your work is queued to be submitted to the cluster, batch scheduler facilitates scheduling your job depending on your requirements in terms of memory, GPU usage and time, and those of the existing jobs on the cluster. In other words, a batch scheduler is a referee that makes sure everyone is treated fairly by reducing conflicts in resource allocation and increasing the accessibility of computing resources to the users.
In this tutorial, we learn how to use SLURM, a famous job scheduling system for large and small Linux clusters.
NOTE: How things are organized in the cluster that you use may be different from mine. Make sure you get familiar with your cluster beforehand.
Work with the cluster
Let’s delve more into how to use a cluster in practice.
Step 1: setup your data and code locally
Say, you want to train a model in Python using a set of datasets. Normally, you’d do the following:
python3 run_my_code.pyNow, if you want a job scheduling system like SLURM take care of training your model, you should forget about running your code directly. Rather, you should submit a job by creating a configuration in SLURM that specifies what you need from the cluster.
You configuration in SLURM looks like this (notice the comments that I have left with ##):
#!/bin/bash
#SBATCH -p gpuq
#SBATCH -q gpu
#SBATCH --job-name=test ## The name of your job
#SBATCH --nodes=1 ## how many nodes does your need?
#SBATCH --ntasks=8 ## how many tasks do you require?
#SBATCH --mem=32GB ## hom much memory do you need?
#SBATCH --gres=gpu:A100.40gb:4 ## number of GPUs per node (gres=gpu:N)
#SBATCH --export=ALL
#SBATCH -t 5-0:0:0 ## how much time does your job need? 5 days!
#SBATCH --output=/scratch/your_id/training/LANG-%a-%j.txt ## where to save the output of your job
#SBATCH --mail-type=ALL ## get notified by email about whatever happens to my job
#SBATCH --mail-user=your_email@gmu.edu

ml gnu10; ml cuda; ml cudnn; ml nvidia-hpc-sdk; ml python; ## module you need to load

echo "Start process"
echo "SLURM_JOBID: " $SLURM_JOBID

RUNPATH=/scratch/your_id
cd $RUNPATH

echo "Starting Venv"
source $RUNPATH/envs/torch1/bin/activate ## activate your virtual environment

echo "Running the script"
python3 run_my_code.py

deactivate
echo "End process"
The configuration has two main parts:
- The header where the needs of your job are specified, like memory and time
- The body where the set of process that you need the job to do are specified, like loading required packages, activating a virtual environment and running your code.
Save this as config.sh or config.slurm and make sure it’s in your working directory on the cluster.
Step 2: Submit the job
Even though it is possible to use command-line editors like Vim or Emacs, it is sometimes easier to handle some configurations locally. So, you can setup most of your project locally; you can always apply tiny modifications on the server later.
Once your code and data are available, transfer everything to your desired directory on the server. For this, usually scp is used as follows:
scp my_data_code.tar.gz my_id@domain:/directoryYou should make sure that my_id@domain:/directory points to the correct directory at your profile on the cluster. As a side note, you can also transfer the data back from the server to your local machine as follows:
scp my_id@domain:/directory ./local_directoryAnd, there you go. Just submit the job using sbatch as follows:
sbatch config.shNow, you should let SLURM allocate resources to your job and train your model. You can check your jobs as follows:
squeue -u your_id This is pretty much all!
Other useful commands
Always compress/decompress your files!
To compress use this:
tar -czf file_1 file_2 ...and to decompress, use this:
tar -xvzf file_name.tar.gzAlways use virtual environment
Before submitting your job, make sure that all your required packages are installed in a virtual environment. I presonaly use venv as follows:
python3 -m venv envs/my_envand activate it within my SLURM configuration as follows:
source /envs/my_env/bin/activateOrganize your code better
If you want to run programs in batches, rather than creating multiple projects and setting up the parameters for each one individually, try creating one single script and passing arguments to work with different setups. That way, you can also use job arrays (sarray) to pass arguments in an array.
The body of your configuration would look like the following if you use sarray:
echo "Start process"
echo "SLURM_JOBID: " $SLURM_JOBID
echo "SLURM_ARRAY_TASK_ID: " $SLURM_ARRAY_TASK_ID
echo "SLURM_ARRAY_JOB_ID: " $SLURM_ARRAY_JOB_ID

RUNPATH=/scratch/your_id
cd $RUNPATH

echo "Starting Venv"
source $RUNPATH/envs/torch1/bin/activate ## activate your virtual environment

echo "Running the script"


python3 run_my_code.py configs/LANG_$SLURM_ARRAY_TASK_ID.yaml

deactivate
echo "End process"
This way, instead of submitting many jobs, you can submit only one and let SLURM iterate over the configurations using sarray.
Finally
It’s a bit difficult to get used to SLURM, I must admit. However, once you learn how to use it, it’s truly enjoyable! There are many ways to make your SLURM jobs more efficient. Here are some useful links:
- Using SLURM a little bit more efficiently
- Monitoring slurm efficiency with reportseff
- Getting Job Efficiency
Last updated on 28 January 2023.